OpenSees Cloud
OpenSees AMI
How to Use Block2D
09 Jan 2023 - Michael H. Scott
Although the mesh commands outlined in previous posts
(here
and here)
are more
powerful, the block2D and block3D commands remain useful, especially if you want to
use quadrilateral or brick elements.
Ed C++ Love based the OpenSees block commands on the meshing functionality in FEAP.
So, if you are familiar with FEAP, these commands should look familiar. This post will
focus on block2D.
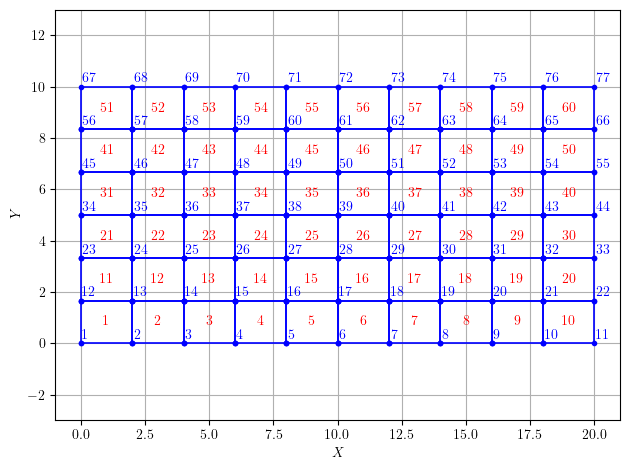
The basic idea is to define corner points for the block, then the command creates nodes and elements from the user-specified number of elements in the block. The command takes element specific arguments that are passed into each element the block creates. For example, to create a 10x6 mesh of quad elements with node and element tags each starting at 1, use the following code.
import openseespy.opensees as ops

L = 20
b = 10
t = 1.0

E = 29000.0
v = 0.3

ops.wipe()
ops.model('basic','-ndm',2,'-ndf',2)

ops.nDMaterial('ElasticIsotropic',1,E,v)

eleArgs = [t,'PlaneStress',1]
points = [1,0,0,
          2,L,0,
          3,L,b,
          4,0,b]
ops.block2D(10,6,1,1,'quad',*eleArgs,*points)
This produces the model shown below (plotted using
opsvis) with 77 nodes and 60 elements.
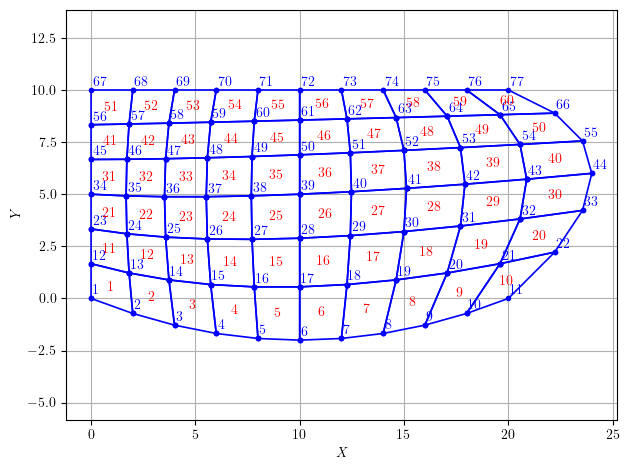
You can also define curved meshes by supplying edge points 5-8 and/or point 9 in the
block2D command. The
wiki page
has a good explanation of points 5 through 9.
# Points 5 and 6 to curve edge 1-2 and 2-3, respectively
points = [1,0,0,
2,L,0,
3,L,b,
4,0,b,
5,L/2,-2,
6,L+4,b-4]
ops.block2D(10,6,1,1,'quad',*eleArgs,*points)
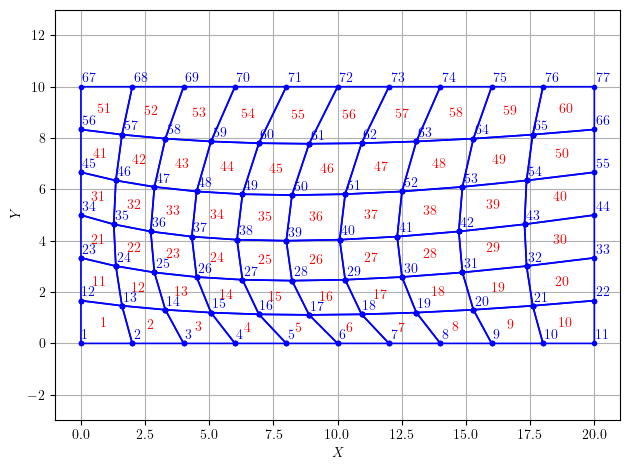
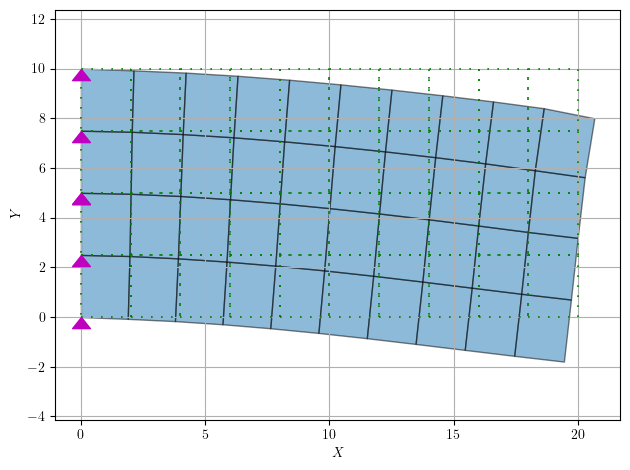
# Point 9 to curve the interior mesh
points = [1,0,0,
2,L,0,
3,L,b,
4,0,b,
9,L/2-2,b-6]
ops.block2D(10,6,1,1,'quad',*eleArgs,*points)
The above meshes show general features, but usually you will define regular meshes in
layers using multiple calls to the block2D command. In this case, you need to ensure
you pass starting node and element tags that will not cause a conflict. Instead of a
magic number,
pass in one more than the largest tag already defined.
points = [1,0,0,
          2,L,0,
          3,L,b/2,
          4,0,b/2]
ops.block2D(10,2,1,1,'quad',*eleArgs,*points)

eleStart = max(ops.getEleTags()) + 1
nodeStart = max(ops.getNodeTags()) + 1
points = [1,0,b/2,
          2,L,b/2,
          3,L,b,
          4,0,b]
ops.block2D(10,2,nodeStart,eleStart,'quad',*eleArgs,*points)

# fix along X=0
ops.fixX(0,1,1)
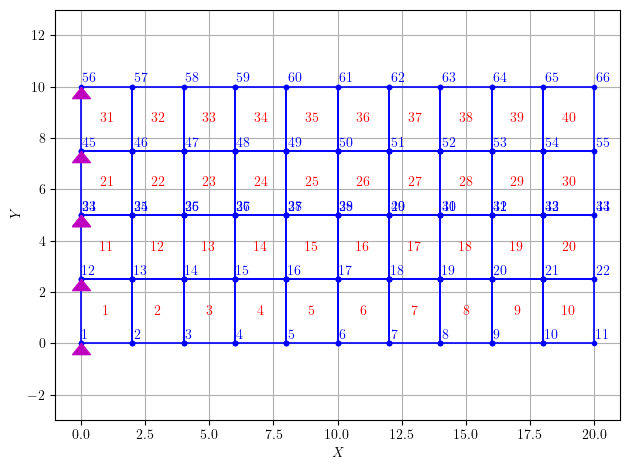
Notice in the above mesh there are collocated nodes along the mesh boundary. Without further model adjustments, applying a load, e.g., at the free end, leads to an incompatible solution.
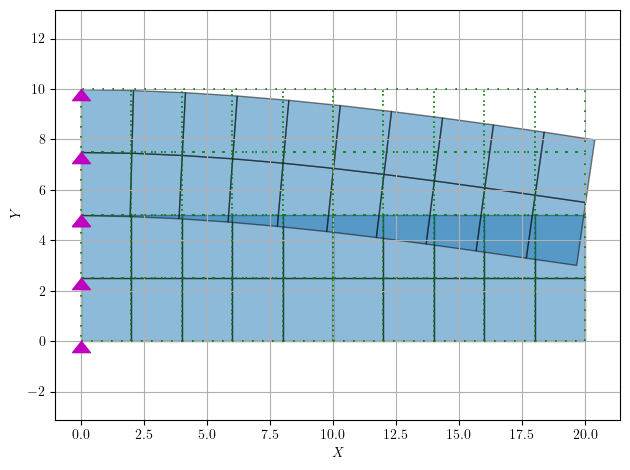
The nodes along the block interface must be joined. Unlike FEAP, there is no tie
command in OpenSees–you have to do it yourself.
Below is generic Python code to perform the tie operation with a tolerance on the internodal distance. The first if-statement in the inner loop ensures we don’t tie a node to itself and that we don’t tie nodes to each other twice.
import numpy as np

for ndI in ops.getNodeTags():
    XYZI = np.array(ops.nodeCoord(ndI))
    for ndJ in ops.getNodeTags():
        if ndI <= ndJ:
            continue
        XYZJ = np.array(ops.nodeCoord(ndJ))
        if np.linalg.norm(XYZJ-XYZI) < 1e-8:
            ops.equalDOF(ndI,ndJ,1,2)
Note that this code will work for any model, but adjust the equalDOF command accordingly.
For this model, the resulting solution with tied blocks is shown below. Much better!
I’ll do a separate post on block3D.